Today we have a particular mission. Make and install LED diode blinking while data receiving from BBMagic METEO.
So we need:
- LED diode
- 200R – 500R resistor
- Raspberry Pi 3 or Raspberry Pi zero W with system installed. If you need information how to install OS it can help you: : Quick system installation on Raspberry Pi
- BBMagic module ex. BBMagic METEO
- free bbm_logger app – you can get it from Download page
… and lets go:
- Solder resistor to LED. You can use PCB if you want.

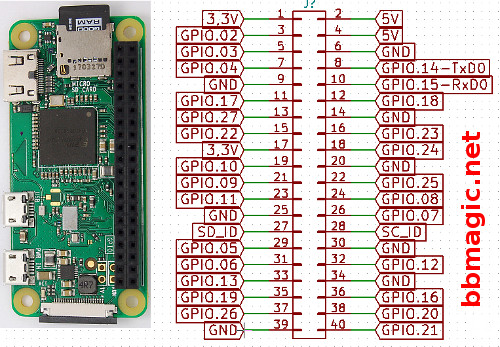
IMPORTANT: make sure that current through LED with resistor does not exceed 10 mA with 3,3V supply voltage. - Choose Raspberry Pi GPIO and connect previously prepared LED. Im choosing GPIO.27.

Blinking effect depends from LED connecting way. There are two possibilities:

- Power up BBMagic METEO module and configure it to mode 1 – data sending every 2 seconds. If you dont know how to do it, look at this:BBMagic METEO data transferring period configuration

- Download bbm_logger_1.0 software from Download section. In text mode simply write:
wget http://bbmagic.net/download/bin/bbm_logger_1.0 - Change bbm_logger_1.0 file permissions:
chmod 755 bbm_logger_1.0 - Run it:
sudo ./bbm_logger_1.0 l27
And thats all. LED flashes while Raspberry Pi receives data from BBMagic METEO module. Congratulations !!